Author name: TrendyGlow

Hairstyles & Styling

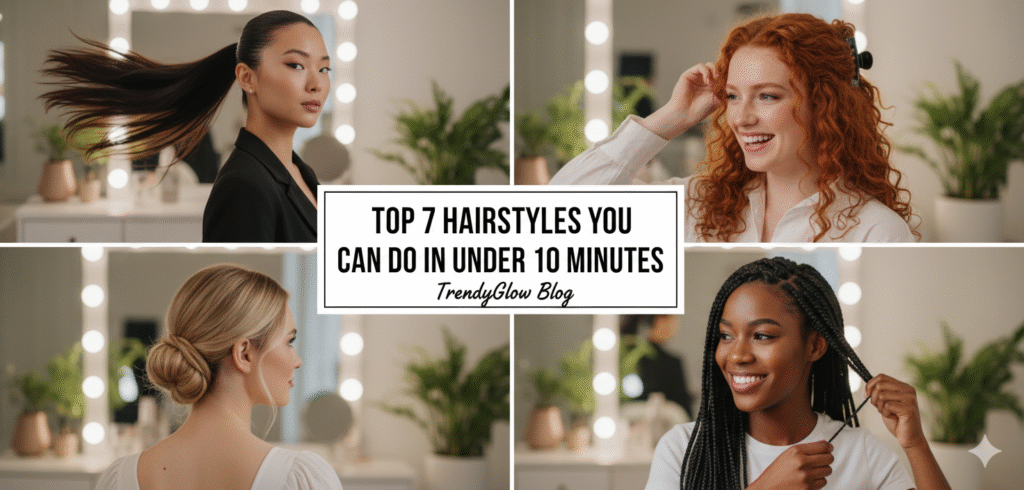
Top 7 Hairstyles You Can Do in Under 10 Minutes β°πŸ’β€β™€οΈ

Hey there, TrendyGlow family! πŸ‘‹ We all have those mornings, don’t we? The alarm goes off, you hit snooze one (or five!) too many times, and suddenly you’re in a mad dash to get ready. Your outfit is sorted, your makeup is on point, but your hair? It’s a whole other story. 🀯 But being short on time doesn’t mean you have to settle for a messy bun (unless that’s the look you’re going for! πŸ˜‰). There are a ton of chic, polished, and surprisingly easy hairstyles you can master in under 10 minutes. The key is to have a few go-to styles in your arsenal. Ready to conquer your busy mornings and look fabulous while doing it? Let’s dive into these seven time-saving hairstyles that are perfect for any hair length or type! ✨   1. The Low Twisted Bun πŸ₯¨   This hairstyle looks complicated, but it’s deceivingly simple and perfect for adding a touch of elegance to your everyday look. It’s a sleek alternative to the classic messy bun and works great for both second-day hair and clean hair. How to do it: Pull your hair into a low ponytail at the nape of your neck and secure it with an elastic. Create a gap above the elastic and flip your ponytail up and through the hole. Repeat the flip-through step one more time. Gently roll the twisted ponytail upwards into a bun and secure it with bobby pins. Pull out a few face-framing pieces to soften the look.   2. The Sleek High Ponytail 🐴   A high ponytail is a timeless classic that instantly lifts your face and gives you a polished, powerful look. It’s perfect for a day at the office, a workout, or a night out. How to do it: Flip your head upside down and gather all your hair at the crown. Use a brush to smooth out any bumps, then secure with a strong hair tie. Take a small section of hair from the underside of the ponytail and wrap it around the elastic to conceal it. Secure with a bobby pin. For extra shine, apply a small amount of hair serum to the ponytail.   3. The Half-Up Top Knot 🍑   Can’t decide between an updo and letting your hair down? This style gives you the best of both worlds! It’s effortlessly cool and perfect for a casual day or to show off your length while keeping hair out of your face. How to do it: Section off the top half of your hair (from your temples up). Secure this section into a high ponytail. Twist the ponytail into a small bun and secure with an elastic or a few bobby pins. Gently tug on the bun to loosen it slightly for a messier, more “undone” look.   4. The Bubble Ponytail 🎈   This playful and trendy style is so much easier than it looks! It adds a fun, whimsical flair to a simple ponytail and works on almost any hair length. How to do it: Create a regular high, mid, or low ponytail and secure it with an elastic. Add another elastic a few inches down the ponytail, creating a “bubble.” Gently tug on the sides of the bubble to puff it out and add volume. Continue adding elastics and creating bubbles every few inches down the length of your hair. If you want to hide the elastics, you can wrap a small strand of hair around each one and secure it with a bobby pin.   5. The Messy Bun with a Twist πŸŒ€   The messy bun is a lifesaver, but this variation adds a chic twist that elevates it from “just rolled out of bed” to “effortlessly stylish.” How to do it: Pull your hair into a high ponytail but don’t secure it all the way on the last loop, creating a small knot. Take the loose end of the ponytail and twist it around the base of the bun. Tuck the ends into the elastic or secure with a bobby pin. Gently pull on different sections of the bun to create a fuller, messier shape. Pull out a few strands around your face.   6. The Side Braid with a Twist πŸŽ€   A simple side braid can look a bit flat, but adding a twist at the base makes it look intentional and polished. How to do it: Part your hair on the side and gather all your hair on the opposite side, over your shoulder. Take a small section of hair from your hairline on the side with less hair and twist it back, adding in small pieces as you go. Once the twist reaches the back of your head, secure it with a bobby pin. Now, braid the rest of your hair into a classic three-strand braid. Secure the end with a clear elastic and gently pull on the sides of the braid to loosen it and make it look thicker.   7. The Claw Clip Updo 🌸   Claw clips are back in a big way, and for good reasonβ€”they make a chic updo incredibly easy and fast! How to do it: Gather all your hair as if you’re making a ponytail. Twist the hair upwards, coiling it tightly against your head. Once twisted, fold the coiled hair back down on itself, creating a small bun-like shape. Secure the style with a large claw clip at the base of your neck. Let the ends of your hair spill out of the top of the clip for a relaxed, chic vibe. There you have it, gorgeous! Seven amazing hairstyles that will save you time and make you look put-together, even on the most chaotic of mornings. Remember to keep a few key tools on handβ€”hair ties, bobby pins, and a good brushβ€”and you’ll be a pro in no time. πŸ’– Which of these hairstyles is your new go-to for a quick fix? Let us know in the comments below!

Bridal Inspiration

Top Celebrity-Inspired Bridal Looks You Can Recreate in 2025 πŸ’–βœ¨

Hey there, future brides and wedding enthusiasts! πŸ‘°πŸ’ Dreaming of walking down the aisle with that undeniable celebrity glow? You’re in luck! Every year, A-list weddings set the trends, and 2025 is already looking like a spectacular year for bridal beauty inspiration. From timeless elegance to modern glam, celebrity brides give us endless ideas to steal for our own big day. But here’s the best part: you don’t need a team of Hollywood stylists to achieve these breathtaking looks! With a little insider knowledge and the right products, you can recreate these top celebrity-inspired bridal looks right in your own mirror. Get ready to gather some serious inspo as we reveal the trends that will make you feel like a star on your wedding day! 🌟 Let’s get you wedding-ready, TrendyGlow style! ✨   1. The “Clean Girl” Aesthetic: Hailey Bieber’s Effortless Glow 🌟   Hailey Bieber’s wedding look was the epitome of chic, understated elegance. It championed the “clean girl” aesthetic – flawless, glowing skin, subtle eyes, and a focus on natural beauty. This look is perfect for the bride who wants to look radiant and fresh without feeling overly “done.” How to Recreate It: Flawless Base: Focus on skincare leading up to the day. For makeup, use a light-to-medium coverage luminous foundation or a skin tint. Conceal only where needed. The key is to let your skin shine through! Subtle Eyes: A wash of neutral eyeshadow (think soft browns or champagne shimmers), a thin line of brown or black eyeliner close to the lash line, and a few coats of lengthening mascara. Forget heavy falsies; opt for natural-looking individuals if you want extra oomph. Defined Brows: Keep brows natural but perfectly groomed. Use a clear brow gel to set them in place. Peachy Nudes: A soft, peachy-nude blush on the apples of the cheeks and a matching lip gloss or satin lipstick will complete this fresh look. Highlighter: A touch of liquid or cream highlighter on the high points of the face (cheekbones, cupid’s bow) for that healthy, ethereal glow.   2. The Modern Romantic: Sofia Richie Grainge’s Understated Glamour πŸ’–   Sofia Richie Grainge’s bridal beauty captured hearts with its sophisticated yet effortlessly romantic vibe. Her look was polished, classic, and exuded quiet luxury – perfect for the bride who desires a timeless and elegant appearance with a touch of modern allure. How to Recreate It: Velvet Skin: A medium-coverage foundation with a soft, natural matte or velvet finish. Ensure it’s seamlessly blended and set minimally to maintain a skin-like texture. Soft Smoky Eye: A slightly more defined eye than the “clean girl” look. Think soft brown and taupe eyeshadows, blended to create subtle depth. A soft, diffused eyeliner and individual or strip lashes that add density without being overly dramatic. Structured Brows: Brows are a bit more filled in and defined, but still soft and natural-looking, not harsh. Elegant Lip: A beautiful soft rose, mauve, or dusty pink lipstick with a satin or creamy finish. This adds a touch of color that brightens the face without overpowering the overall look. Subtle Contour & Blush: Gentle contouring to define features and a classic rose or peach blush for a healthy flush.   3. The Hollywood Glamour: Priyanka Chopra Jonas’s Show-Stopping Vibe πŸ’Ž   Priyanka Chopra Jonas brought unparalleled glamour to her wedding, showcasing a look that was bold, regal, and utterly captivating. This is for the bride who wants to make a statement, embrace a bit more drama, and feel like a true red-carpet queen on her big day. How to Recreate It: Full Coverage Radiance: A full-coverage foundation that still looks radiant, ensuring a perfect, long-lasting base. Strategic use of contour and highlight to sculpt the face. Dramatic Eyes: A smoky eye (it could be browns, golds, or even a subtle charcoal) with a defined winged eyeliner. Don’t shy away from voluminous false lashes to really open up the eyes. Consider a touch of shimmer on the inner corner or center of the lid for extra sparkle. Bold Brows: Expertly filled and sculpted brows that frame the dramatic eye look perfectly. Power Lip: A signature bold lip color! Think deep berries, classic reds, or rich plums. If you opt for a very strong eye, you could go for a slightly softer, yet still impactful, nude with a satin finish. Bronzed Glow: A generous application of bronzer to warm up the complexion and a luminous powder highlighter for that show-stopping sheen.   4. The Boho Chic Bride: ZoΓ« Kravitz’s Effortless Cool 🌿   While her wedding was private, ZoΓ« Kravitz’s signature style always leans towards cool, understated bohemian. For the non-traditional bride, this look is all about an earthy palette, glowing skin, and a free-spirited vibe that feels effortlessly beautiful. How to Recreate It: Natural, Luminous Skin: Think less foundation, more healthy skin! Use a tinted moisturizer or a very light foundation. Embrace freckles and natural skin texture. A cream blush in a warm rose or terracotta shade for a natural flush. Earthy Eyes: Warm bronze, gold, or soft brown eyeshadows lightly dusted over the lids. A smudge of brown liner on the upper lash line. Skip heavy mascara or use a very natural brown formula. Undone Brows: Keep brows incredibly natural – maybe just a clear gel to tame them. Sheer, Warm Lips: A tinted lip balm or a sheer, warm nude lipstick that looks like your lips, but better. Sun-Kissed Glow: Focus on bronzer to give that sun-kissed, just-back-from-vacation look. A very subtle, natural highlighter.   5. The Fresh & Fun Bride: Ariana Grande’s Sweet Simplicity 🌸   Ariana Grande’s intimate wedding look was a masterclass in sweet simplicity and understated charm. It was delicate, angelic, and perfectly suited for a bride who wants a soft, pretty, and utterly romantic feel. How to Recreate It: Soft Focus Skin: A light-to-medium coverage foundation that blurs imperfections while maintaining a dewy, youthful look. Focus on a brightened under-eye with a creamy concealer. Lifted Eyes: A very

Hairstyles & Styling

10 Stunning Saree Draping Styles You Need to Try for Weddings & Parties (2025 Guide) πŸ’ƒβœ¨

Hey, Gorgeous! Are you ready to turn heads and steal the spotlight at every wedding and party you attend in 2025? πŸ‘‘ At TrendyGlow, we believe every woman deserves to feel like a queen, and what better way to achieve that than with the timeless elegance of a saree? But let’s be real, the traditional drape, while beautiful, sometimes leaves us craving something fresh and exciting. πŸ˜‰ Good news! We’ve scoured the latest trends and brought you 10 breathtaking saree draping styles that are not just stunning but also surprisingly easy to master (with a little practice, of course!). Get ready to elevate your ethnic game and make a dazzling statement wherever you go. πŸ’–   Why Saree Draping Matters More Than You Think πŸ€”   A saree isn’t just a piece of fabric; it’s a canvas for your personality. The way you drape it can transform your entire look, accentuate your best features, and even tell a story. With the right drape, you can go from understated elegance to glamorous diva in minutes. 🀩 Plus, trying new styles is a fantastic way to reinvent your existing saree collection, making it feel brand new! Let’s dive into the styles that will make you the talk of the town! πŸ₯³ The TrendyGlow Guide to Saree Draping Perfection:   1. The Classic Nivi Drape with a Modern Twist πŸŽ€ The Nivi drape is the foundation, but let’s give it a 2025 upgrade! Instead of a simple pleat, try a narrower, more structured pallu for a sleek look. Or, experiment with a contrasting belt to cinch the waist and add a contemporary edge. This style is universally flattering and perfect for any formal occasion. 2. The Elegant Mermaid Drape πŸ§œβ€β™€οΈ Want to show off your curves? The Mermaid drape is your go-to! This style beautifully hugs your figure around the hips and then flares out at the bottom, creating a stunning silhouette. It’s perfect for a grand reception or a red-carpet event where you want all eyes on you. Pair it with a statement blouse! 3. The Sophisticated Dhoti Style Saree ✨ Fusion wear at its finest! The Dhoti style saree is comfortable, chic, and incredibly fashionable. It involves draping the saree like a dhoti at the bottom, often worn with leggings or trousers underneath, and a pallu draped over the shoulder. Ideal for sangeets, mehndi ceremonies, or even a chic party where you want to dance freely. πŸ’ƒ 4. The Royal Gown Style Drape πŸ‘Έ Yes, you read that right – a saree that looks like a gown! This pre-stitched or cleverly draped style gives the illusion of a glamorous gown while retaining the essence of a saree. It’s perfect for those who want a hassle-free yet incredibly opulent look for black-tie weddings or engagement parties. 5. The Double Pallu Drama πŸ’– Why have one pallu when you can have two? This stunning style involves draping one pallu traditionally and bringing a second, often contrasting, pallu over the other shoulder or wrapping it around the neck like a scarf. It adds incredible volume and grandeur, perfect for a bridal look or a close family wedding. 6. The Belted Saree for a Chic Statement ⛓️ This is perhaps the easiest way to instantly elevate any saree drape. Cinch your waist with a stylish ethnic belt, a metallic one, or even a sleek leather belt for a modern touch. It defines your silhouette and adds a fashionable edge to your traditional attire. Ideal for a trendy party look! 7. The Neck Wrap Drape 🧣 For a truly unique and sophisticated look, try wrapping your pallu around your neck like a stylish scarf. This works wonderfully with lightweight sarees and adds an instant touch of high fashion. It’s excellent for cooler evenings or when you want to make a bold, contemporary statement. 8. The Pant Style Saree πŸ‘– Another fantastic fusion option! Instead of a petticoat, wear tailored pants (cigarette pants, palazzo pants, or even skinny jeans for a super casual look) and drape your saree over them. This creates a comfortable, edgy, and incredibly stylish outfit perfect for fashion-forward events or a casual chic gathering. 9. The Gujarati/Seedha Pallu Drape πŸ™ This traditional drape, where the pallu comes from the back to the front over the right shoulder and is spread across the chest, offers a beautiful way to showcase the intricate work on your pallu. It’s elegant, graceful, and perfect for more traditional ceremonies or when you want to channel classic beauty. 10. The Butterfly Drape πŸ¦‹ Inspired by Bollywood divas, the Butterfly drape involves pinning the pallu neatly on both shoulders, creating a slender, almost ‘butterfly wing’ effect. This drape is fantastic for accentuating your waist and offering a modern, sleek look that’s perfect for parties and glamorous events.   TrendyGlow Pro Tips for Saree Draping Success: πŸ“   Practice Makes Perfect: Don’t wait until the last minute! ⏰ Experiment with these styles at home to find what works best for your body type and saree fabric. Invest in Good Shapewear: A well-fitting saree shapewear (instead of a traditional petticoat) can make all the difference in achieving a smooth, flattering silhouette for many of these modern drapes. Accessorize Wisely: The right jewelry, a statement blouse, and a chic clutch can elevate any saree look. πŸ’πŸ‘œ Comfort is Key: While looking stunning is important, ensure your drape is comfortable enough for you to move, dance, and enjoy the event! πŸ’ƒπŸŽ‰   Your Turn to Shine! ✨   Which of these incredible saree draping styles are you most excited to try first? Do you have a secret draping trick that always gets you compliments? We’d love to hear from you in the comments below! πŸ‘‡ At TrendyGlow, we’re passionate about helping you express your unique style. Keep an eye on our blog for more fashion tips, trend alerts, and stunning ethnic wear collections that will make you glow! πŸ’– Shop the Latest Saree Collections at TrendyGlow Today and Get Ready to Dazzle in

Makeup Tips & Tutorials

Top 7 Makeup Mistakes Beginners Make (and How to Avoid Them) πŸ™…β€β™€οΈβœ¨

Hey there, TrendyGlow beauties! Ever scroll through Instagram, admiring those flawless makeup looks, and then feel a pang of frustration with your own attempts? You’re not alone! 😩 Makeup is an art, and like any art, it takes practice and a little know-how to master. But don’t worry, we’ve all been there – those early days of wonky eyeliner and mismatched foundation. πŸ™ˆ The good news? Many common makeup mistakes are super easy to fix once you know what to look for! And that’s exactly what we’re diving into today! Get ready to level up your makeup game as we reveal the top 7 blunders beginners often make and, more importantly, how you can gracefully sidestep them. πŸ˜‰ Ready to transform your routine from “oops” to “wow”? Let’s glow! ✨   1. The Foundation Fiasco: Wrong Shade, Wrong Application 🎨   This is perhaps the most common and noticeable mistake. A foundation that doesn’t match your skin tone or is applied incorrectly can look mask-like and accentuate imperfections rather than blurring them. 🎭 How to Avoid It: Shade Matching: Always swatch foundation on your jawline in natural light. β˜€οΈ Let it sit for a few minutes to see how it oxidizes. The perfect shade will seamlessly disappear into your skin. Don’t test on your hand – it’s rarely the same color as your face! Application: Start with a small amount and build up coverage. Use a damp beauty sponge or a foundation brush for an even, blended finish. πŸ–ŒοΈ Blend, blend, blend, especially around your hairline and jawline, to avoid harsh lines. Primer Power: A good primer creates a smooth canvas, helping your foundation glide on effortlessly and last longer. πŸ‘   2. The Unblended Blusher: Clown Cheeks Alert! 🀑   Blush is fantastic for adding a healthy flush and dimension to your face, but a heavy hand or unblended application can leave you looking like you’ve just joined the circus! πŸŽͺ How to Avoid It: Less is More: Start with a tiny amount of product on your brush. It’s always easier to add more than to take away. Placement: Smile naturally and apply blush to the apples of your cheeks, blending upwards towards your temples. 😊 Blend It Out: Use a clean, fluffy brush to soften any harsh edges. The goal is a natural flush, not a stark stripe of color. ✨   3. The Over-Penciled Brows: Hello, Sharpie Brows! πŸ–ŠοΈπŸ€¨   Your eyebrows frame your face, and well-groomed brows can instantly elevate your look. However, drawing them on too darkly or too dramatically can make them look unnatural and harsh. How to Avoid It: Match Your Hair: Choose a brow product (pencil, powder, or gel) that’s one shade lighter than your natural brow hair. Feather-Light Strokes: Instead of drawing a solid line, use small, hair-like strokes to fill in sparse areas. Brush Through: Always brush through your brows with a spoolie after applying product to soften lines and blend the color evenly. 🧹   4. The Raccoon Eye Effect: Too Much, Too Dark Eyeliner/Eyeshadow πŸΌπŸ‘οΈ   While a smoky eye can be stunning, applying too much dark eyeliner or eyeshadow all around your eye, especially on the lower lash line, can make your eyes look smaller and create a “raccoon” effect. How to Avoid It: Strategic Placement: If you’re going for a defined look, consider lining only the upper lash line or extending eyeliner only halfway on the lower lash line. Soften with Shadow: If you do line your lower lash line, use a small smudge brush to soften the line with a matching eyeshadow. Less is More (Again!): When using dark eyeshadows, build up the color gradually. Blend well to avoid harsh lines.   5. Mascara Mishaps: Clumpy Lashes & Spider Legs πŸ•·οΈπŸ˜©   Mascara is a magic wand for opening up your eyes, but clumpy, spidery lashes can instantly ruin an otherwise polished look. How to Avoid It: Wipe Excess: Before applying, gently wipe any excess product off the mascara wand with a tissue. ΰ€Ÿΰ€Ώΰ€Άΰ₯‚ Zig-Zag Motion: Wiggle the wand from the base of your lashes to the tips in a zig-zag motion to separate and coat each lash evenly. 〰️ Comb It Out: If you do get clumps, use a clean spoolie or a lash comb to brush through your lashes while they’re still wet. Fresh Mascara: Replace your mascara every 3-6 months to prevent it from drying out and becoming clumpy. πŸ—“οΈ   6. The Unset Makeup: Creasing, Fading, and Sliding 🫠   Ever notice your concealer settling into fine lines or your makeup melting away by midday? Not setting your liquid and cream products is a common culprit. How to Avoid It: Setting Powder: After applying foundation and concealer, lightly dust a translucent setting powder over areas prone to creasing (under eyes) or oiliness (T-zone). πŸ’¨ Setting Spray: Finish your entire makeup look with a setting spray. This helps fuse all the layers together, makes your makeup last longer, and can give a more natural, less powdery finish. πŸ’¦   7. The Unclean Tools: Dirty Brushes, Dirty Skin 🀒 brushes   This isn’t just a makeup mistake; it’s a skincare blunder! Using dirty brushes can harbor bacteria, leading to breakouts and an uneven makeup application. 🦠 How to Avoid It: Regular Cleaning: Wash your makeup brushes at least once a week (or more frequently for foundation and concealer brushes) with a gentle brush cleaner or baby shampoo. 🧼 Air Dry: Lay them flat on a towel to air dry completely. 🌬️ Sponge Care: Clean your beauty sponges after every 1-2 uses. 🧽 There you have it, TrendyGlow gorgeous! By being mindful of these common pitfalls and implementing these simple fixes, you’ll be well on your way to achieving a flawless and natural-looking makeup application every time. Remember, practice makes perfect, so don’t be afraid to experiment and find what works best for you! πŸ’– What are your go-to tips for avoiding makeup blunders? Share your wisdom in the comments below! πŸ‘‡ Let’s

Makeup Tips & Tutorials

How Do I Choose the Right Foundation Shade for My Skin Tone? πŸ€” Your Ultimate 2025 Guide!

Hey Gorgeous! Ever stared at a wall of foundation bottles, feeling completely overwhelmed? You’re not alone! Choosing the perfect foundation shade can feel like solving a complex puzzle, but at TrendyGlow, we believe every woman deserves to find her flawless match. A foundation that’s too light or too dark can throw off your entire look, while the right shade can make your skin look radiant and seamless. ✨ No more ghostly pale or orange-tinged mishaps! We’ve created the ultimate guide to help you confidently pick your perfect foundation shade for 2025 and beyond. Get ready to unlock your most natural, glowing complexion yet!   Why the Right Foundation Shade is Your Beauty Secret Weapon 🀫   Think of foundation as the canvas for your masterpiece. If the canvas isn’t right, the whole painting won’t look its best. The correct foundation shade: Evens out your skin tone without looking mask-like. Blends seamlessly with your neck and dΓ©colletage. Provides a natural finish, enhancing your beauty, not hiding it. Boosts your confidence – because when your base is flawless, you feel unstoppable! Let’s dive into the steps that will transform your foundation shopping experience!   TrendyGlow’s Foolproof Steps to Finding Your Perfect Match:   Step 1: Understand Your Undertone – The Secret Sauce! 🎨 This is the MOST crucial step! Your skin’s undertone is the subtle hue beneath its surface. It doesn’t change with sun exposure. Cool Undertones: Your skin has pink, red, or bluish hints. You might burn easily, and veins on your wrist appear blue. Silver jewelry looks fantastic on you! Warm Undertones: Your skin has golden, yellow, or peachy hints. You tan easily, and veins on your wrist appear green. Gold jewelry complements you beautifully! Neutral Undertones: You have a mix of both cool and warm, or no obvious undertone. Your veins might appear a mix of blue and green, and both gold and silver jewelry suit you. Pro Tip: If you’re still unsure, think about how you react to the sun. If you burn easily, you likely have cool undertones. If you bronze easily, you’re probably warm. Step 2: Swatch, Swatch, Swatch! But Where? πŸ€” Forget swatching on your hand – it rarely matches your face! The best places to test foundation shades are: Your Jawline: This is the ideal spot as it bridges your face and neck, ensuring a seamless blend. Your Neck/Chest: If your face is much lighter or darker than your body, test here to ensure overall harmony. Apply three to four shades that look close to your skin tone in small stripes. Let them sit for a few minutes to allow the foundation to oxidize (some foundations change color slightly once exposed to air). Step 3: The Natural Light Test β˜€οΈ Indoor lighting (especially in stores) can be incredibly deceiving! What looks perfect under fluorescent lights might be completely wrong in broad daylight. Always step outside or stand near a window to check your swatches. The right shade will virtually disappear into your skin, blending effortlessly without leaving a harsh line. It shouldn’t look ashy, orange, or starkly different from your natural skin tone. Step 4: Consider Your Skin Type & Desired Finish ✨ While shade is key, don’t forget your skin type and what kind of finish you want! Oily Skin: Look for oil-free, matte, or semi-matte foundations. Dry Skin: Opt for hydrating, dewy, or luminous foundations. Combination Skin: A satin finish or balancing formula often works best. Desired Finish: Do you want a natural, dewy glow, or a velvety matte look? This will narrow down your options! Step 5: Don’t Be Afraid to Ask for Samples! πŸ›οΈ Many beauty stores and counters offer samples. This is a game-changer! Take a few samples of your closest matches home and test them properly over a full day. See how they wear, how they react to your skin’s natural oils, and if they still look good in different lighting conditions. This is the ultimate test!   TrendyGlow Pro Tips for Foundation Perfection:   Your Skin Changes: Your skin tone can change slightly with seasons (tanning in summer, paler in winter). Don’t be surprised if you need a slightly different shade for different times of the year! Mix & Match: Many people own two shades and mix them to create their perfect match, especially as their skin tone fluctuates. Don’t Overdo It: Foundation is meant to even out your skin, not create a new one. Start with a small amount and build coverage where needed. Seek Expert Advice: Don’t hesitate to ask a beauty consultant at a reputable store for help. Their trained eyes can often spot your undertone and perfect match quickly.   Your Flawless Face Awaits! ✨   Finding the right foundation shade doesn’t have to be a daunting task. By understanding your undertone, swatching correctly, and testing in natural light, you’ll be well on your way to a flawless complexion that looks like your skin, only better! What’s your biggest foundation struggle? Share your tips or questions in the comments below! We love hearing from our TrendyGlow community! πŸ‘‡ Discover Your Perfect Match with TrendyGlow’s Curated Foundation Collection – Shop Now!

Makeup Tips & Tutorials

What’s the Best Makeup Routine for Oily, Combination & Dry Skin? πŸ€”βœ¨

Hey there, TrendyGlow family! πŸ‘‹ Ever wonder why that “holy grail” foundation your bestie raves about just doesn’t work for you? Or why your meticulously applied makeup seems to slide off by midday, while someone else’s stays flawless? The secret often lies in understanding your skin type! πŸ’‘ Just like you wouldn’t use the same shampoo for oily and dry hair, your makeup routine needs to be tailored to your skin’s unique needs. Applying the wrong products or techniques can lead to a less-than-perfect finish, breakouts, or even emphasize issues you’re trying to conceal. 😩 But don’t fret! Today, we’re breaking down the ideal makeup routines for three common skin types: oily, combination, and dry. Get ready to unlock the secrets to a radiant, long-lasting look, no matter what your skin throws at you! πŸš€ Let’s dive in and get your glow on! ✨   1. Oily Skin: The Shine Control Powerhouses πŸ’ͺ   Oily skin types often battle with excess sebum production, leading to a shiny T-zone, enlarged pores, and makeup that tends to “melt” or crease. The goal here is shine control, longevity, and a matte (but not flat!) finish. Your Oily Skin Makeup Routine Must-Haves: Prep: Start with a lightweight, oil-free moisturizer. Follow with a mattifying primer – this is your best friend! It creates a smooth base and helps control oil throughout the day. Look for ingredients like silica or dimethicone. Foundation: Opt for oil-free, matte, or semi-matte liquid foundations, or even powder foundations. Look for terms like “long-wear,” “oil-control,” or “pore-minimizing.” Apply with a damp beauty sponge for a natural finish, blotting away any excess. Concealer: Choose a full-coverage, long-wear concealer that sets quickly to avoid creasing on oily lids or under-eye areas. Setting: This step is NON-NEGOTIABLE! Dust a generous amount of translucent setting powder over your entire face, focusing on your T-zone. Then, lock it all in with a mattifying setting spray to extend wear time and keep shine at bay. Blush/Bronzer/Highlight: Powder formulas generally work best and last longer on oily skin. Be mindful with highlighters; opt for subtle, finely milled powders rather than creamy or super shimmery formulas that might emphasize oiliness. Touch-Ups: Keep blotting papers and a compact powder handy for quick touch-ups throughout the day. Avoid: Heavy, dewy foundations and primers, excessive cream products, and skipping setting powder.   2. Combination Skin: The Balancing Act βš–οΈ   Combination skin is like having two skin types in one – typically an oily T-zone (forehead, nose, chin) and normal to dry cheeks. The key here is to strategically address each area without over-treating the other. It’s all about balance! ☯️ Your Combination Skin Makeup Routine Must-Haves: Prep: Use a lightweight, hydrating moisturizer all over. You might consider using two different primers: a mattifying primer on your T-zone and a hydrating or brightening primer on your drier areas (cheeks). Foundation: A satin-finish or natural-finish liquid foundation often works beautifully. You want something that offers good coverage without being overly matte or too dewy. If needed, you can lightly powder your T-zone more heavily than your cheeks. Concealer: Choose a versatile, medium-to-full coverage concealer that blends well and sets without looking cakey. Setting: Lightly dust translucent setting powder on your T-zone to control shine. On your drier areas, use a very minimal amount or skip it altogether. A hydrating setting spray can help meld everything together and add a touch of luminosity without making you oily. Blush/Bronzer/Highlight: You have the flexibility to use both cream and powder formulas! Cream blushes and highlighters can look beautiful on drier cheeks, while powders work well on the T-zone. Just remember to blend! Avoid: Extremely heavy matte foundations all over (can make cheeks feel tight) or overly dewy products all over (can increase T-zone shine).   3. Dry Skin: The Hydration Heroes πŸ’§   Dry skin often lacks natural oils, leading to a dull appearance, flaky patches, tightness, and makeup that can look patchy, emphasize dry spots, or feel uncomfortable. The goal is hydration, luminosity, and a smooth, comfortable finish. ✨ Your Dry Skin Makeup Routine Must-Haves: Prep: This is the most crucial step! Start with a rich, hydrating moisturizer, and let it sink in. Follow with a hydrating, illuminating, or dewy primer. Look for ingredients like hyaluronic acid or glycerin. Foundation: Opt for hydrating, luminous, or dewy liquid foundations. Tinted moisturizers, BB creams, or CC creams are also great choices for a natural, glowy finish. Apply with a damp beauty sponge to press moisture into the skin. Concealer: Choose a creamy, hydrating concealer that won’t settle into fine lines or emphasize dryness. Avoid thick, matte formulas. Setting: Go easy on the powder! If you must, use a very light hand with a finely milled hydrating setting powder only where absolutely necessary (e.g., under eyes to prevent creasing). A dewy or hydrating setting spray is your best friend to melt powders into the skin and add a radiant finish. Blush/Bronzer/Highlight: Cream or liquid formulas are fantastic for dry skin! They add moisture and a beautiful, natural glow without clinging to dry patches. If using powder, ensure your skin is well-hydrated first. Avoid: Mattifying primers and foundations, heavy powdering, and any products that feel drying or tight. No matter your skin type, remembering to always prep your skin well and blend thoroughly are universal keys to success! πŸ”‘ Experiment with these tips, listen to your skin, and you’ll discover the perfect routine that makes you feel confident and radiant. Which skin type are you, and what are your must-have products? Share your secrets with the TrendyGlow community below! πŸ‘‡ We love hearing from you! πŸ’–

Scroll to Top